Tutorial: Express
This tutorial outlines how to create a simple Express server using Noderize. You can see the final code here with a running demo.
Our goal is to have 2 endpoints:
GET /: Displays welcome messageGET /greet: Accepts anameparameter and greets the user
Time required: ~5 minutes.
Setup
To start, create your Noderize app and cd into it:
yarn create noderize basic-express
# or
npx create-noderize basic-express

# then
cd basic-express
Next, we'll install our express dependency:
yarn add express
# or
npm install express
Our package.json should look something like this (except the versions being the latest):
{
    "name": "basic-express",
    "version": "0.1.0",
    "private": true,
    "scripts": {
        "watch": "noderize-scripts watch",
        "test": "noderize-scripts test",
        "format": "noderize-scripts format",
        "build": "noderize-scripts build",
        "start": "noderize-scripts start"
    },
    "devDependencies": {
        "@noderize/scripts": "*"
    },
    "dependencies": {
        "@noderize/runtime": "*",
        "express": "^4.16.2"
    }
}
Express server
Looking into src/index.js, we can see an empty app. Let's clear the file and start making our app.
We'll first start by importing Express using ES modules and creating our Express server.
import express from "express";

const app = express();
To determine which port our web server will run on, we'll try reading from the PORT environment variable, and default back to 3000:
const port = parseInt(process.env.PORT) || 3000;
Next, we will tell Express to listen to requests. We will also provide a callback to notify us that our app is running:
app.listen(port, () => {
    console.log(`Listening at http://localhost:${port}`);
});
Finally, for our GET / route, we'll attach a function to send Hello from Noderize!:
app.get("/", (req, res) => {
    res.send("Hello from Noderize!");
});
Running our app
Let's try it out! Let's start our app in development mode using watch:
yarn watch
# or
npm run watch
When visiting http://localhost:3000, we'll see this:
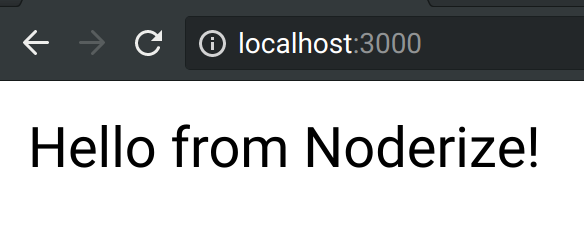
Success! From now on, our code will automatically update on changes.
Greeting route
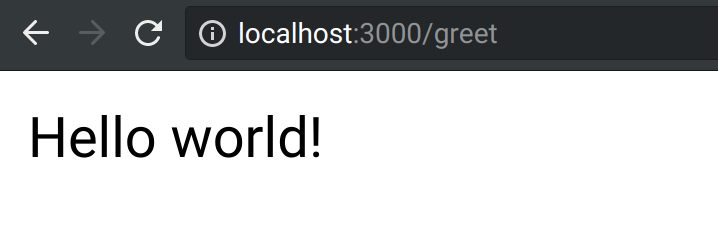
Let's next add our greeting endpoint, which takes a name parameter (defaulting to world) and returns a greeting:
app.get("/greet", (req, res) => {
    res.send(`Hello ${req.query.name || "world"}!`);
});

Finished!
Summary
In this tutorial we saw how to: